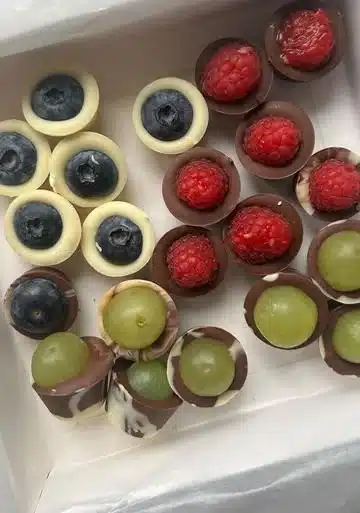
Delight in Every Bite: Chocolate Berry Cups
There’s something magical about the combination of chocolate and fresh berries. This delightful recipe for Chocolate Berry Cups springs from my fond memories of summer barbecues with friends and family. Those afternoons spent savoring the rich, decadent sweetness of chocolate and the refreshing tartness of berries always left my taste buds dancing with joy. Not only do these treats look gorgeous on any table, but they also capture that perfect balance of flavors that leaves everyone wanting more. Whether you’re hosting a gathering or just seeking a quick sweet fix at home, these Chocolate Berry Cups will surely succeed in impressing everyone around you.
Why make this recipe?
You’re in for a treat! You should try making Chocolate Berry Cups because they are incredibly delicious and simple to whip up. This recipe is perfect if you want something quick to prepare but still want to impress your guests. It doesn’t require advanced culinary skills, so even beginner cooks can jump into the fun. Plus, these cups are budget-friendly, requiring only a few ingredients that you might already have at home. Also, kids absolutely love these vibrant delights, making them an ideal choice for family gatherings or school parties. So grab your apron, and let’s get started!
How to make Chocolate Berry Cups
Making Chocolate Berry Cups takes only about an hour and a half, including chill time. You won’t need any fancy kitchen gadgets—just your microwave or a double boiler to melt the chocolate and a silicone ice cube tray to shape the cups. With just a handful of ingredients and a few easy steps, you can create eye-catching desserts that your friends and family will adore. Let’s dive into this fun, easy-to-follow recipe!

Ingredients
- Chocolate (dark or milk)
- Berries (strawberries, blueberries, raspberries)
- Silicone ice cube tray
Step-by-step directions
Now, let’s get to the fun part—making these delicious Chocolate Berry Cups together! Here’s how I like to do it:
- Melt the chocolate in a microwave or double boiler. If using a microwave, heat it in short intervals and stir in between to avoid burning.
- Pour the melted chocolate into the silicone ice cube tray. Fill each compartment so that you create a chocolate cup.
- Place the berries into the melted chocolate, ensuring they are well covered. Press them down gently to adhere to the chocolate.
- Let them set in the fridge for about an hour. This cools the chocolate and solidifies the cups.
- Once set, remove the cups from the tray and enjoy! You can also wrap them in cellophane bags or a little box for gifts.

How to serve Chocolate Berry Cups?
Serving these delightful Chocolate Berry Cups is all about creativity! You can arrange them on a beautiful platter as a centerpiece for dessert. They pair wonderfully with a scoop of vanilla ice cream or a dollop of whipped cream for an extra touch of indulgence. If you’re feeling adventurous, sprinkle some crushed nuts or shredded coconut over the top for added texture. Feel free to drizzle some extra melted chocolate on them just before serving for that "wow" factor!
How to store Chocolate Berry Cups?
Keeping your Chocolate Berry Cups fresh is simple! Store them in an airtight container in the fridge for up to five days. If you want to keep them longer, pop them in the freezer. These treats freeze beautifully and can last for up to two months. Just make sure to let them thaw in the fridge for a little while before serving, so they regain their lovely texture and flavors.
Tips for perfect Chocolate Berry Cups
- Choose high-quality chocolate. It makes a significant difference in taste. The better the chocolate, the better your dessert will turn out!
- Don’t rush the melting process. If using a microwave, melt the chocolate in short bursts to avoid burning. Stir in between until smooth.
- Make sure your berries are dry before adding them to the chocolate. Excess moisture can lead to the chocolate not sticking well.
- Be creative! Experiment with other fruits, like bananas or orange segments, if you want to switch things up.
- Always check for set time in your fridge. If they feel soft, give them a little extra time to firm up.
Variations
Feeling inspired? Here are a few tasty variations to the classic Chocolate Berry Cups:
- Nutty Surprise: Add chopped nuts or a sprinkle of granola on top of the chocolate before they set for added crunch.
- Flavor Infusion: Try adding a hint of vanilla extract or a dash of sea salt into the melted chocolate for a gourmet twist.
- Dark Chocolate Delight: Use dark chocolate instead of milk chocolate for a richer flavor that pairs beautifully with the tartness of the berries.
FAQs about Chocolate Berry Cups
Can I substitute different fruits?
Absolutely! You can substitute with almost any seasonal fruit. Sliced bananas, mini marshmallows, or even small pieces of caramel will work beautifully. Just keep in mind the moisture content of the fruit you choose!
Why did my chocolate not set properly?
If your chocolate isn’t setting, it might be due to moisture. Ensure that both your chocolate and the berries are completely dry before you start. Also, make sure the fridge is cold enough for proper firming.
Will it work if I reduce the chocolate?
You can reduce the amount of chocolate slightly, but be careful not to cut too much out. This could lead to fragile cups that break easily. If you’re looking to make a lighter option, consider filling the cups with a mix of yogurt and fruit instead of straight chocolate.
Now that you know the ins and outs of making Chocolate Berry Cups, it’s time to gather those ingredients and let the fun begin! Your friends and family will thank you for it, and you might just find yourself making these delightful treats over and over again!
Print
Chocolate Berry Cups
- Total Time: 90 minutes
- Yield: 12 servings 1x
- Diet: Vegetarian
Description
Delightful chocolate cups filled with fresh berries, perfect for gatherings or a quick sweet fix.
Ingredients
- 100g Dark or Milk Chocolate
- 1 cup Berries (strawberries, blueberries, raspberries)
- 1 Silicone ice cube tray
Instructions
- Melt the chocolate in a microwave or double boiler. If using a microwave, heat it in short intervals and stir in between to avoid burning.
- Pour the melted chocolate into the silicone ice cube tray. Fill each compartment to create a chocolate cup.
- Place the berries into the melted chocolate, ensuring they are well covered. Press them down gently to adhere to the chocolate.
- Let them set in the fridge for about an hour. This cools the chocolate and solidifies the cups.
- Once set, remove the cups from the tray and enjoy! They can also be wrapped in cellophane bags or a little box for gifts.
Notes
Choose high-quality chocolate, ensure berries are dry, and serve creatively with ice cream or whipped cream.
- Prep Time: 15 minutes
- Cook Time: 15 minutes
- Category: Dessert
- Method: Chilling
- Cuisine: American
Nutrition
- Serving Size: 1 cup
- Calories: 150
- Sugar: 10g
- Sodium: 30mg
- Fat: 8g
- Saturated Fat: 4g
- Unsaturated Fat: 4g
- Trans Fat: 0g
- Carbohydrates: 15g
- Fiber: 2g
- Protein: 2g
- Cholesterol: 10mg
Keywords: chocolate dessert, berry cups, summer treat, easy recipe, kids dessert