Peppermint Bark is the ultimate holiday treat that transforms simple ingredients into pure festive magic. Tired of store-bought confections that lack that homemade touch and cost a fortune?
Hi, I’m Jack welcome to my kitchen cooks foody ! This peppermint bark recipe was born from my early holiday baking disasters when I tried to impress guests with elaborate desserts that always seemed to fall flat.
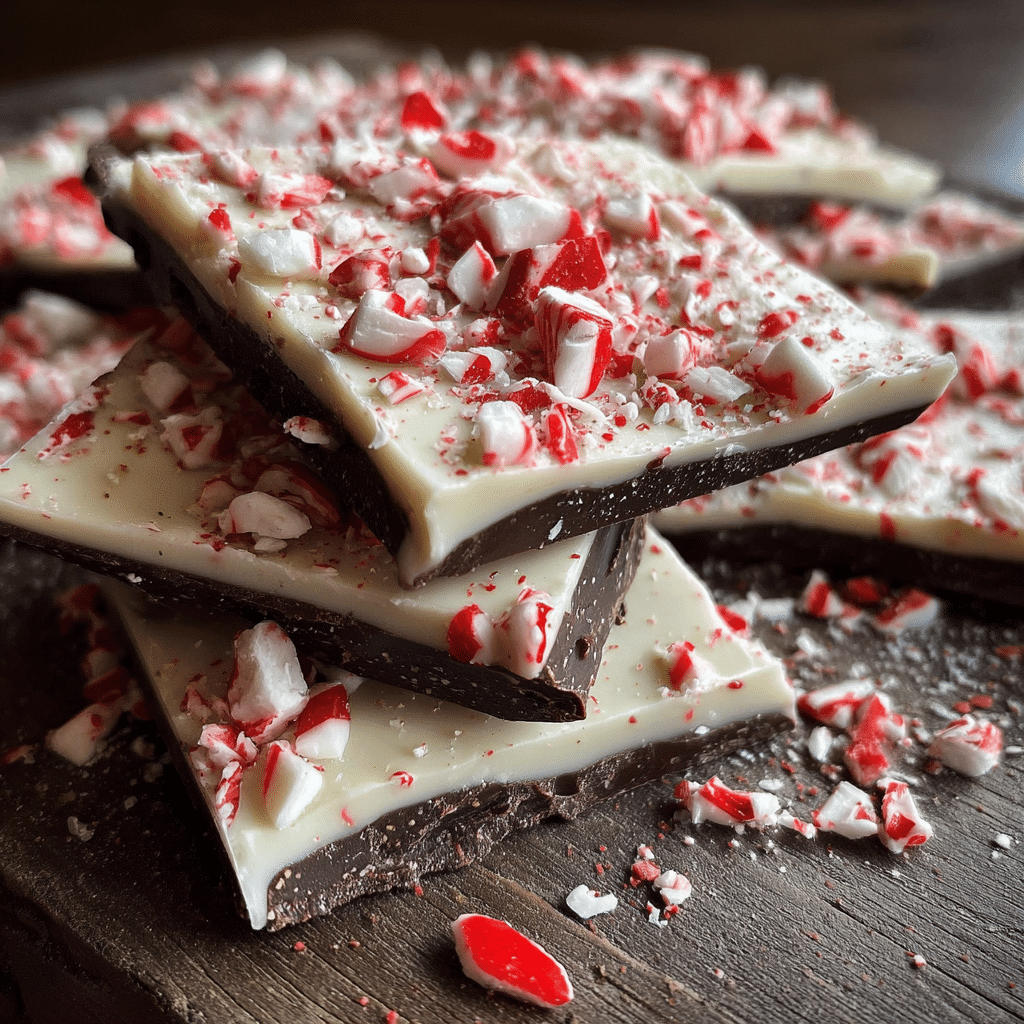
This silky smooth chocolate creation topped with refreshing peppermint pieces melts in your mouth with the perfect balance of rich cocoa and cool mint.
As a recipe developer who’s spent years perfecting holiday treats, I’ve discovered the exact techniques and timing that create flawless peppermint bark every single time. In this comprehensive guide, we’ll explore everything from selecting premium chocolate and crushing peppermint candies to mastering tempering techniques and creating stunning presentations. You’ll learn professional candy-making secrets, foolproof methods, creative variations, and answers to the most common peppermint bark questions.
Why This Peppermint Bark Recipe Works
This peppermint bark delivers exceptional results through three key advantages: incredible flavor balance, surprising simplicity, and remarkable versatility for gifting and entertaining.
• Uses affordable, easy-to-find chocolate and candy canes creates gourmet results without specialty ingredients • Ready in just 20 minutes active time for maximum impact with minimal kitchen effort
• Perfect for holiday gifts or festive gatherings scales beautifully for large batches
The magic happens through proper chocolate tempering and strategic layering that creates the signature snap and smooth finish. Fresh peppermint pieces provide textural contrast and cooling sensation in every bite of your peppermint bark.
Choosing the Right Chocolate for Peppermint Bark
Selecting quality chocolate is absolutely critical for achieving the best peppermint bark texture, flavor, and appearance.
Best Chocolate Types for This Recipe
Semi-sweet or dark chocolate works magnificently for peppermint bark because the slight bitterness balances the sweet peppermint perfectly. High-quality chocolate with 60-70% cocoa content provides rich depth without overwhelming the mint. White chocolate creates beautiful contrast as the top layer in traditional peppermint bark.
Buying Tips
Choose chocolate bars or high-quality chips rather than candy melts for superior flavor. Look for chocolate with cocoa butter listed as the primary fat avoid products with vegetable oils. European or premium American brands offer better melting properties for your peppermint bark. Check expiration dates and avoid chocolate with white bloom on the surface.
Substitutions
Milk chocolate can replace semi-sweet for sweeter peppermint bark, though the flavor balance changes. Sugar-free chocolate works for diabetic-friendly versions. Chocolate chips substitute for bars but may require additional cocoa butter for smooth melting in your peppermint bark.
Ingredients & Prep for Peppermint Bark

Proper ingredient selection and preparation techniques ensure your peppermint bark achieves maximum flavor and perfect texture.
Chocolate Prep Essentials
Chop chocolate bars into uniform small pieces for even melting this prevents scorching and ensures smooth consistency. Bring all ingredients to room temperature before starting. Clean all equipment thoroughly as any water residue can cause chocolate to seize in your peppermint bark.
Peppermint Candy Selection for Peppermint Bark
• 12-15 standard candy canes provides classic peppermint flavor and festive appearance
• 1/2 teaspoon peppermint extract intensifies mint flavor without overpowering
• Pinch of sea salt enhances chocolate flavor and balances sweetness
• Food coloring (optional) creates custom colors for themed peppermint bark
Essential Pantry Staples
Parchment paper for easy removal, double boiler or microwave-safe bowls for melting, and rolling pin for crushing candies. Offset spatula helps spread chocolate evenly for professional-looking peppermint bark results.
Step-by-Step Making Instructions for Peppermint Bark

Follow these detailed steps for foolproof peppermint bark that looks and tastes professionally made.
Pre-Cooking Prep for Peppermint Bark
Line 9×13 inch baking sheet with parchment paper, leaving overhang for easy removal. Crush candy canes by placing in sealed plastic bag and gently hammering until pieces are uniform but not powdery. Set up double boiler or prepare microwave-safe bowls for melting chocolate in your peppermint bark.
Making Method for Peppermint Bark
Melt 12 ounces dark chocolate using double boiler method, stirring constantly until smooth and glossy. Pour onto prepared parchment, spreading evenly with offset spatula to create base layer. Refrigerate 15 minutes until just set but still slightly tacky for proper adhesion.
Melt 8 ounces white chocolate using same method, then stir in peppermint extract and food coloring if desired. Pour over dark chocolate layer, spreading gently to cover completely.
Setting Check for Peppermint Bark
Immediately sprinkle crushed candy canes over white chocolate while still warm for proper adhesion. Gently press pieces into surface using clean hands or spatula. The white chocolate should still be soft enough to accept toppings in your peppermint bark.
Cooling Your Peppermint Bark
Refrigerate completed bark for 1-2 hours until completely firm and set. Avoid freezing, which can cause chocolate bloom and textural issues. Properly set peppermint bark should snap cleanly when broken and have glossy finish throughout.
If you enjoyed this recipe, be sure to share it with your friends or save it for later!
I’d love to see your unique twist feel free to share your photos on Pinterest
Pro Tips for Perfect Peppermint Bark
Master these professional techniques to elevate your peppermint bark from good to absolutely extraordinary.
Avoiding Common Mistakes in Peppermint Bark
Never let water contact melting chocolate even tiny amounts cause seizing. Don’t rush the setting process by using freezer, which creates texture problems. Avoid over-crushing peppermint pieces, which creates dusty rather than crunchy texture in your peppermint bark.
Essential Tool Recommendations for Peppermint Bark
Instant-read thermometer ensures proper melting temperatures. Offset spatula creates smooth, even layers. Heavy-duty baking sheets prevent warping. Sharp knife dipped in warm water makes clean cuts through set peppermint bark.
Storage & Gift-Giving with Peppermint Bark
Store finished peppermint bark in airtight containers at room temperature up to 2 weeks. Layer pieces between parchment paper to prevent sticking. For gifts, wrap individual pieces in cellophane bags or arrange in decorative tins for beautiful presentation of your peppermint bark.
Flavor Variations for Peppermint Bark
Transform your basic peppermint bark into exciting new treats with these creative flavor combinations and techniques.
Seasonal Twists
Orange peppermint bark uses orange extract and candied orange peel instead of traditional mint. Espresso version incorporates instant coffee powder into dark chocolate layer. Spiced variation adds cinnamon and nutmeg for warm holiday flavors in your peppermint bark.
Creative Combinations
Pretzel peppermint bark includes crushed pretzels for salty crunch. Nut lover’s version features chopped almonds or pistachios alongside peppermint. Cookie variation incorporates crushed chocolate wafers between layers for extra texture in your peppermint bark.
| Variation | Key Ingredients | Special Notes | Flavor Profile |
|---|---|---|---|
| Salted Caramel | Caramel bits, sea salt | Drizzle caramel before setting | Sweet, salty, rich |
| Mocha Mint | Espresso powder, coffee beans | Use strong coffee extract | Bold, caffeinated |
| Cookies & Cream | Crushed chocolate cookies | Press into white layer | Nostalgic, crunchy |
| Raspberry Mint | Freeze-dried raspberries | Add berry pieces on top | Fruity, refreshing |
Serving Suggestions for Peppermint Bark
Present your peppermint bark in elegant ways that enhance the holiday experience and create memorable moments.
Arrange pieces on festive platters alongside other holiday cookies and candies. Create gift boxes with tissue paper and ribbon for elegant presentations. Serve with hot cocoa or coffee for perfect flavor pairings that complement your peppermint bark beautifully.
Package in clear cellophane bags tied with festive ribbons for party favors. Display on tiered serving stands for stunning holiday buffet presentations. Pair with vanilla ice cream for an elegant dessert featuring your homemade peppermint bark.
FAQs About Peppermint Bark
Can I make peppermint bark without a double boiler?
Absolutely! Microwave chocolate in 30-second intervals, stirring between each interval until smooth. This method works perfectly for peppermint bark, though watch carefully to prevent overheating and burning.
How do I fix seized chocolate in peppermint bark?
Add 1 tablespoon vegetable oil or shortening per cup of chocolate, stirring vigorously. If chocolate remains lumpy, start over with fresh chocolate for best peppermint bark results. Prevention through dry equipment works better than fixes.
Is this peppermint bark recipe safe for children to help make?
Yes! Children can help crush candy canes and sprinkle toppings while adults handle hot chocolate melting. This makes an excellent family activity for creating peppermint bark together during holidays.
Can I prepare peppermint bark weeks in advance?
Definitely! Properly stored peppermint bark keeps 3-4 weeks at room temperature in airtight containers. This makes it perfect for advance holiday preparation and gift-giving of your homemade peppermint bark.
Conclusion
Get started with your peppermint bark adventure today! You’ll discover why this simple yet elegant treat has become a holiday tradition in kitchens worldwide. The combination of rich chocolate and refreshing mint creates pure seasonal joy in every bite.
Print
Perfect Peppermint Bark 5 Secret Techniques for Success
- Total Time: 140
- Yield: 16 1x
- Diet: Vegetarian
Description
Rich, smooth chocolate layers topped with refreshing peppermint pieces create the perfect holiday treat that’s both elegant and easy to make.
Ingredients
12 oz dark chocolate (60-70% cocoa), chopped
8 oz white chocolate, chopped
12–15 standard candy canes
1/2 teaspoon pure peppermint extract
Pinch of sea salt
Red food coloring (optional)
Parchment paper for lining
Instructions
1. Line 9×13 inch baking sheet with parchment paper, leaving overhang
2. Place candy canes in sealed plastic bag and crush with rolling pin until uniform pieces
3. Melt dark chocolate using double boiler method, stirring until smooth
4. Pour dark chocolate onto parchment, spread evenly with offset spatula
5. Refrigerate 15 minutes until just set but still slightly tacky
6. Melt white chocolate using same method, stir in peppermint extract and coloring
7. Pour white chocolate over dark layer, spread gently to cover completely
8. Immediately sprinkle crushed candy canes over warm white chocolate
9. Gently press pieces into surface for good adhesion
10. Refrigerate 1-2 hours until completely firm and set
11. Remove from pan using parchment overhang and break into irregular pieces
Notes
Use high-quality chocolate for best results and smooth melting
Keep all equipment completely dry – water will cause chocolate to seize
Don’t over-crush candy canes – you want pieces, not powder
Store in airtight container at room temperature up to 3 weeks
Makes excellent holiday gifts when packaged in decorative boxes
- Prep Time: 20
- Category: Dessert
- Method: No-Bake
- Cuisine: American
Nutrition
- Serving Size: 1 piece
- Calories: 185
- Sugar: 18g
- Sodium: 25mg
- Fat: 11g
- Saturated Fat: 7g
- Unsaturated Fat: 3g
- Trans Fat: 0g
- Carbohydrates: 22g
- Fiber: 2g
- Protein: 3g
- Cholesterol: 3mg
Keywords: peppermint bark, holiday candy, chocolate bark, Christmas treats, homemade candy