
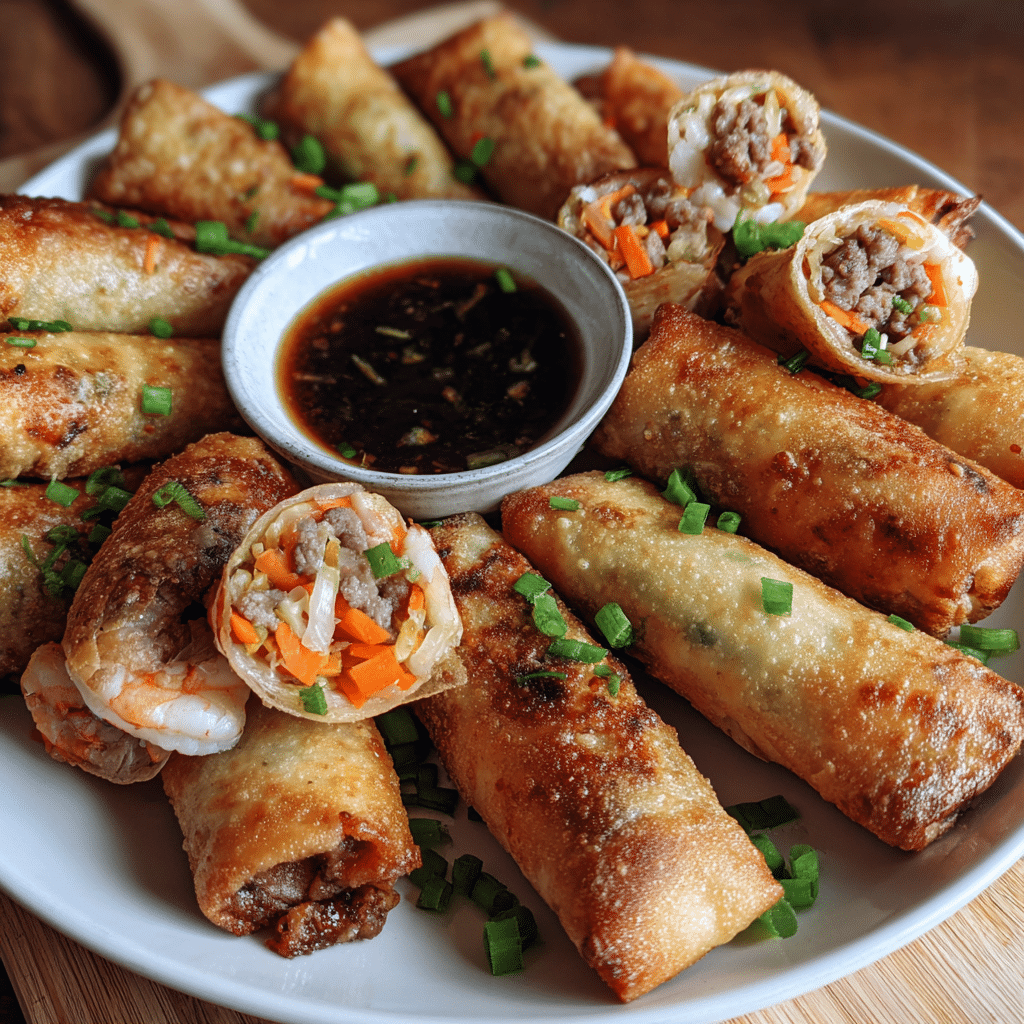
Filipino Lumpia Recipe has transformed countless gatherings in my kitchen
I’m Jack, the recipe developer behind Cooks Foody. Let me share a story: During my first attempt at hosting a Filipino-themed dinner party, I served soggy, grease-laden spring rolls that barely resembled authentic lumpia.
My guests were polite, but I knew I’d failed. That embarrassing evening sparked a two-year journey to perfect this beloved Filipino delicacy.
After countless batches, consultations with Filipino home cooks, and experimenting with wrapper techniques, I’ve cracked the code to achieving that signature golden crispiness with a savory, perfectly seasoned filling.
This Filipino Lumpia Recipe delivers restaurant-quality results right in your home kitchen. You’ll discover the secret to paper-thin wrappers that shatter at first bite, a umami-rich filling that never tastes greasy, and foolproof frying techniques that guarantee consistent results.
Whether you’re preparing appetizers for weeknight dinners or feeding a crowd during celebrations, this recipe scales beautifully and can be made ahead. I’ll guide you through meat selection strategies, wrapper-sealing tricks that prevent oil seepage, proper frying temperatures, and storage solutions for batch cooking. At Cooks Foody, I believe cooking should bring joy and connection and these crispy golden rolls do exactly that.
Why This Filipino Lumpia Recipe Works
This Filipino Lumpia Recipe succeeds because it balances authentic flavor with practical home-cooking techniques. After testing dozens of variations, I’ve streamlined the process without sacrificing that essential crunch and savory satisfaction.
- Uses affordable ground meat and everyday vegetables No exotic ingredients required; everything’s available at standard grocery stores
- Prep in 20 minutes with simple mixing The filling comes together faster than ordering takeout, with minimal chopping
- Freezes beautifully for up to 3 months Roll a double batch and store them raw; fry directly from frozen for instant appetizers
- Adapts to dietary preferences easily Swap proteins, add more vegetables, or create vegetarian versions without losing structural integrity
- Achieves authentic crispiness without deep-frying expertise My temperature guide ensures golden perfection even for beginners
Choosing the Right Meat for Your Filipino Lumpia Recipe
Selecting quality protein makes the difference between mediocre and memorable lumpia. The right meat provides moisture, flavor, and the proper texture balance against crispy wrappers.
Best Proteins for This Filipino Lumpia Recipe
Ground chicken delivers the most authentic flavor profile it’s mild enough to let seasonings shine while remaining juicy after cooking. The 85/15 lean-to-fat ratio prevents greasiness while keeping the filling moist. Ground turkey works as a leaner alternative, though it requires slightly more seasoning. For richer flavor, ground beef (80/20) adds depth, but drain excess fat after pre-cooking to prevent soggy wrappers.
Buying Tips for Filipino Lumpia Recipe Success
Look for ground meat with visible moisture and bright color avoid packages with brown edges or excessive liquid pooling. Ask your butcher to grind chicken thighs fresh if available; the dark meat contains more flavor than breast meat. Purchase meat the day you plan to cook for optimal freshness, or freeze immediately upon arriving home. Always check expiration dates and select packages from the back of the refrigerated case where temperatures stay most consistent.
Protein Substitutions in Filipino Lumpia Recipe
Swap ground chicken for ground turkey at a 1:1 ratio, adding an extra tablespoon of oil to compensate for turkey’s leanness. Ground beef works wonderfully but requires pre-cooking and draining. For seafood lovers, finely chopped shrimp (about ½ pound mixed with ½ pound ground chicken) creates luxurious lumpia with sweet oceanic notes. Vegetarian versions use crumbled firm tofu or finely chopped mushrooms as protein replacements.
Ingredients & Prep for Filipino Lumpia Recipe
Proper preparation sets you up for rolling success. This Filipino Lumpia Recipe requires attention to ingredient prep—especially vegetable moisture content, which can make or break wrapper crispiness.
Meat Prep Essentials for Filipino Lumpia Recipe
Start with cold ground meat straight from the refrigerator warm meat becomes pasty and difficult to mix evenly. Break meat into small chunks in a large mixing bowl before adding other ingredients. If using beef, pre-cook in a skillet over medium heat for 5 minutes, breaking into crumbles, then drain thoroughly on paper towels and let cool completely. This extra step removes excess fat that would otherwise leak during frying. Never over-mix the filling; gentle folding preserves texture and prevents a dense, tough interior.
Seasonings and Aromatics for Filipino Lumpia Recipe
Base Filling:
- 1 pound ground chicken (85/15 lean-to-fat ratio)
- 2 cups finely shredded cabbage (squeeze out excess moisture)
- 1 cup julienned carrots (matchstick-thin cuts)
- ½ cup finely diced onions
- 4 cloves garlic, minced
- 2 green onions, thinly sliced
Seasonings:
- 2 tablespoons soy sauce (for umami depth)
- 1 tablespoon fish sauce (authentic Filipino flavor)
- 1 teaspoon ground black pepper
- ½ teaspoon garlic powder
- ¼ teaspoon white pepper (subtle heat)
For Assembly:
- 25 lumpia wrappers (spring roll wrappers, not egg roll wrappers)
- 2 tablespoons cornstarch mixed with 3 tablespoons water (sealing paste)
- Vegetable oil for frying (2-3 cups)
Pantry Staples for Filipino Lumpia Recipe
Stock these essentials for authentic flavor: soy sauce adds saltiness and color, fish sauce provides that irreplaceable umami funk, and cornstarch creates the glue that keeps wrappers sealed during frying. Use neutral oils with high smoke points vegetable, canola, or peanut oil work perfectly. Fresh garlic and onions are non-negotiable; dried versions lack the aromatic punch needed. Keep lumpia wrappers in your freezer; they thaw quickly and last for months.
Step-by-Step Cooking Instructions for Filipino Lumpia Recipe

Follow these precise steps to achieve crispy, golden Filipino Lumpia Recipe perfection every single time. Temperature control and proper sealing technique are your keys to success.
Pre-Cooking Prep for Filipino Lumpia Recipe
Thaw lumpia wrappers at room temperature for 30 minutes before rolling they’ll separate easily without tearing. Meanwhile, squeeze shredded cabbage in a clean kitchen towel to remove moisture; this prevents soggy filling. Combine all filling ingredients in a large bowl and mix gently with your hands until just combined—the mixture should hold together when squeezed. Set up your rolling station: wrappers on the left, bowl of filling in the center, cornstarch paste in a small dish, and a baking sheet lined with parchment paper on the right for finished rolls.
Rolling Method for Filipino Lumpia Recipe
Place one wrapper on a clean surface with a corner pointing toward you (diamond orientation). Spoon 2 tablespoons of filling in a horizontal line about 2 inches from the bottom corner, shaping it into a compact log about 4 inches long. Fold the bottom corner over the filling tightly, then fold in both side corners to seal the edges. Roll upward firmly but gently too tight and the wrapper tears, too loose and oil seeps in during frying. Brush the top corner with cornstarch paste and complete the roll, pressing to seal. Place seam-side down on your prepared baking sheet.
Frying Technique for Filipino Lumpia Recipe
Heat 2 inches of oil in a deep, heavy-bottomed pot or wok to exactly 350°F use a thermometer for accuracy. Test with one lumpia first: it should sizzle immediately and float within 10 seconds. Fry 4-5 lumpia at a time without crowding; overcrowding drops oil temperature and causes greasy results. Cook for 3-4 minutes, turning once, until deep golden brown all over. The wrappers should bubble and crisp, with no pale spots remaining.
Doneness Check for Filipino Lumpia Recipe
Perfectly cooked lumpia are uniformly golden brown with blistered, crispy wrappers that sound hollow when tapped. The internal temperature should reach 165°F if using raw chicken. Cut one test lumpia in half—the filling should be steaming hot throughout with no pink remaining, and the wrapper should shatter cleanly rather than bending. If the exterior browns before the filling cooks through, your oil is too hot; reduce to 325°F.
Draining and Resting for Filipino Lumpia Recipe
Transfer fried lumpia immediately to a wire rack set over a baking sheet never drain on paper towels, which trap steam and soften the crispy wrapper. Let rest for 2-3 minutes before serving; this brief waiting period allows the filling to set slightly and prevents mouth-burning. The wrappers will maintain their crunch for about 20 minutes at room temperature. For longer holding, place the wire rack in a 200°F oven to keep lumpia warm and crispy for up to an hour.
If you enjoyed this recipe, be sure to share it with your friends or save it for later!
I’d love to see your unique twist feel free to share your photos on Pinterest
Pro Tips for Perfect Filipino Lumpia Recipe
These insider techniques elevate your Filipino Lumpia Recipe from good to extraordinary. I learned these secrets through trial, error, and guidance from Filipino home cooks.
Avoiding Soggy Filipino Lumpia Recipe Results
Always squeeze excess moisture from vegetables cabbage and carrots release water as they sit. Mix your filling no more than 15 minutes before rolling to prevent moisture accumulation. Never skip the cornstarch paste seal; even a small gap allows oil penetration. Maintain consistent oil temperature between 325-350°F using a thermometer; fluctuating heat is the number one cause of greasy lumpia. Fry immediately after rolling when possible; if you must wait, refrigerate rolled lumpia uncovered to keep wrappers dry.
Essential Tools for Filipino Lumpia Recipe Success
Invest in a deep-fry thermometer ($15-20) to eliminate guesswork temperature consistency matters more than any other factor. Use a spider strainer or slotted spoon for safe removal without breaking delicate rolls. A wire cooling rack prevents steam-induced sogginess better than paper towels. Keep a kitchen towel nearby to cover unused wrappers; they dry out quickly in open air. For batch cooking, a second baking sheet in the freezer allows rapid freezing of uncooked lumpia before transferring to freezer bags.
Storage and Reheating Filipino Lumpia Recipe
Freeze uncooked lumpia in a single layer on a parchment-lined baking sheet for 2 hours, then transfer to freezer bags with air pressed out they’ll keep for 3 months. Fry frozen lumpia directly without thawing, adding 1-2 extra minutes to cooking time. Store cooked lumpia in an airtight container in the refrigerator for up to 3 days. Reheat in a 375°F oven for 10-12 minutes until crispy again microwaving destroys the texture. Never refreeze previously cooked lumpia; the wrappers become permanently soggy.
Flavor Variations for Filipino Lumpia Recipe
This versatile Filipino Lumpia Recipe adapts beautifully to different flavor profiles and dietary needs without losing its essential character.
Spicy Filipino Lumpia Recipe
Add 1-2 teaspoons of sriracha or sambal oelek to the filling mixture for gentle heat that builds gradually. For more aggressive spice, include 2 finely minced Thai bird’s eye chilies or 1 teaspoon of cayenne pepper. Create a spicy dipping sauce by mixing 3 tablespoons sweet chili sauce with 1 tablespoon rice vinegar and ½ teaspoon crushed red pepper flakes. The heat balances beautifully against the crispy wrapper and savory filling.
Low-Carb Filipino Lumpia Recipe Adaptation
Traditional lumpia wrappers contain about 15g of carbohydrates each, making them unsuitable for strict keto diets. For a low-carb version, use egg roll wrappers made with almond flour (available at specialty stores), or create lettuce wraps using the same filling but serving it fresh in butter lettuce cups. The filling itself is naturally low-carb just omit carrots or replace with julienned zucchini. Season with coconut aminos instead of soy sauce to keep it completely grain-free.
Global-Inspired Filipino Lumpia Recipe Twists
Korean-style lumpia incorporates 1 tablespoon of gochugaru (Korean red pepper flakes) and 2 teaspoons of sesame oil into the filling, then serves with a gochujang-mayo dipping sauce. Mediterranean lumpia uses ground lamb seasoned with cumin, coriander, and mint, paired with tzatziki. Thai-inspired versions add lemongrass, basil, and lime zest to the filling. Each variation maintains the crispy wrapper technique while exploring new flavor territories.
Filipino Lumpia Recipe Flavor Comparison Table
| Variation | Key Ingredients | Flavor Profile | Best Paired With |
|---|---|---|---|
| Classic Filipino | Chicken, cabbage, soy sauce, fish sauce | Savory, umami-rich, slightly sweet | Sweet chili vinegar sauce |
| Spicy Filipino | Classic base + sriracha, Thai chilies | Bold heat with savory depth | Cooling cucumber salad |
| Korean-Fusion | Gochugaru, sesame oil, ginger | Smoky, spicy, nutty | Gochujang-mayo dip |
| Mediterranean | Ground lamb, cumin, mint, feta crumbles | Earthy, herbal, tangy | Tzatziki or tahini sauce |
| Thai-Inspired | Lemongrass, basil, lime zest, ginger | Bright, citrusy, aromatic | Peanut-lime dipping sauce |
| Vegetarian | Mushrooms, tofu, extra vegetables | Earthy, light, fresh | Soy-ginger dipping sauce |
Serving Suggestions for Filipino Lumpia Recipe
Present your Filipino Lumpia Recipe with complementary sides and beverages that enhance the crispy, savory experience.
Serve lumpia immediately after frying on a large platter lined with banana leaves for authentic presentation, or use a simple white serving dish to let the golden color shine. Accompany with small bowls of sweet chili vinegar sauce (3 parts rice vinegar, 2 parts sugar, 1 part water with sliced chilies), traditional Filipino banana ketchup, or a simple soy-vinegar dip with garlic. Pair with fresh cucumber salad dressed in rice vinegar to cut through the richness, or serve alongside pancit (Filipino noodles) for a complete meal.
For beverages, crisp light beers like pilsners or wheat beers complement the fried wrapper without overwhelming delicate flavors. Iced calamansi juice (Filipino lime) provides refreshing acidity, while young coconut juice offers natural sweetness. For non-alcoholic options, try iced green tea or sparkling water with lime. These lumpia also work beautifully as part of a larger Filipino feast alongside adobo chicken, garlic fried rice, and ensaladang talong (eggplant salad).
FAQs About Filipino Lumpia Recipe
Can I use frozen vegetables in my Filipino Lumpia Recipe?
Frozen vegetables release excessive moisture during thawing, making your filling watery and wrappers soggy. If you must use frozen vegetables, thaw completely, then squeeze out all liquid using a kitchen towel before adding to the filling. Fresh vegetables always produce superior texture and flavor. The extra few minutes of chopping is worth the dramatically better results.
How do I fix overcooked Filipino Lumpia Recipe?
Unfortunately, once lumpia are overcooked and burned, there’s no way to salvage them—the wrapper turns bitter and the filling dries out. Prevention is key: maintain oil temperature at 350°F and watch carefully during frying. If your lumpia are merely too dark but not burned, serve them with extra dipping sauce to add moisture. For slightly dry filling, brush the finished lumpia with garlic-infused oil immediately after frying.
Is this Filipino Lumpia Recipe safe during pregnancy?
This recipe is safe for pregnant women as long as the ground chicken reaches an internal temperature of 165°F, killing any harmful bacteria. Use a meat thermometer to verify doneness by cutting one lumpia in half and checking the center. Ensure all vegetables are washed thoroughly before chopping. The fish sauce is pasteurized and safe in the small amounts used. Always fry lumpia fully rather than leaving any pink meat inside.
Can I air-fry my Filipino Lumpia Recipe?
Yes, but the texture differs from traditional deep-frying. Brush rolled lumpia lightly with oil, place in a single layer in your air fryer basket, and cook at 375°F for 12-15 minutes, flipping halfway through. They’ll be crispy but lack the blistered, shatteringly crisp texture of oil-fried versions. Air-fried lumpia work well for everyday meals but may disappoint if you’re expecting authentic texture. Increase seasoning by 25% as air-frying tends to mute flavors.
How do I prevent Filipino Lumpia Recipe wrappers from tearing?
Keep unused wrappers covered with a damp towel while rolling to prevent drying. Handle wrappers gently—they’re delicate when thawed. Don’t overfill; 2 tablespoons of filling is the maximum. Roll firmly but not tightly, allowing slight flexibility. If a wrapper tears during rolling, simply wrap the lumpia in a second wrapper, sealing carefully. Purchase high-quality spring roll wrappers from Asian markets rather than supermarket brands, which tend to be thicker and less pliable.
What’s the difference between lumpia and egg rolls in this Filipino Lumpia Recipe?
Lumpia wrappers are paper-thin, creating delicate, crispy rolls with a shatter-like texture. Egg roll wrappers are thicker, contain eggs, and produce a heartier, chewier texture. Filipino lumpia typically feature finer-chopped vegetables and lighter seasoning than Chinese egg rolls. The filling-to-wrapper ratio favors the wrapper in lumpia, while egg rolls pack in more filling. Lumpia are generally smaller and more elegant, perfect as appetizers, while egg rolls serve as heartier snacks or meal components.
Conclusion
Fire up your stove and try this Filipino Lumpia Recipe tonight your family will request it repeatedly! The crispy golden perfection you’ll achieve rivals any restaurant, and the satisfaction of mastering this beloved Filipino dish is unmatched. Join over 5,000 home cooks at Cooks Foody who’ve transformed their kitchens with this recipe, creating new traditions and bringing people together over these irresistible golden rolls.
Print
Filipino Lumpia Recipe 7 Secrets to Incredible Crispy Golden Rolls
- Total Time: 45
- Yield: 25 lumpia 1x
Description
Authentic Filipino Lumpia with crispy golden wrappers and savory chicken-vegetable filling. These addictive spring rolls are perfect for parties, weeknight dinners, or any celebration. Freezer-friendly and easy to make ahead!
Ingredients
1 pound ground chicken (85/15 lean-to-fat ratio)
2 cups finely shredded cabbage, moisture squeezed out
1 cup julienned carrots, matchstick-thin
½ cup finely diced onions
4 cloves garlic, minced
2 green onions, thinly sliced
2 tablespoons soy sauce
1 tablespoon fish sauce
1 teaspoon ground black pepper
½ teaspoon garlic powder
¼ teaspoon white pepper
25 lumpia wrappers (spring roll wrappers)
2 tablespoons cornstarch mixed with 3 tablespoons water
2–3 cups vegetable oil for frying
Instructions
1. Thaw lumpia wrappers at room temperature for 30 minutes. Squeeze shredded cabbage in a kitchen towel to remove excess moisture.
2. Combine ground chicken, cabbage, carrots, onions, garlic, green onions, soy sauce, fish sauce, black pepper, garlic powder, and white pepper in a large bowl. Mix gently with hands until just combined.
3. Set up rolling station with wrappers, filling, cornstarch paste, and parchment-lined baking sheet.
4. Place one wrapper diamond-style. Add 2 tablespoons filling in a horizontal line 2 inches from bottom corner. Shape into a 4-inch compact log.
5. Fold bottom corner over filling tightly, then fold in both side corners. Roll upward firmly, brush top corner with cornstarch paste, and seal. Place seam-side down.
6. Heat 2 inches of oil in a heavy pot to exactly 350°F (use thermometer).
7. Fry 4-5 lumpia at a time for 3-4 minutes, turning once, until deep golden brown all over.
8. Transfer immediately to a wire rack set over baking sheet. Let rest 2-3 minutes before serving.
Notes
Freeze uncooked lumpia in single layer for 2 hours, then transfer to freezer bags. Keeps for 3 months. Fry directly from frozen, adding 1-2 extra minutes.
Maintain oil temperature between 325-350°F for crispy (not greasy) results.
Squeeze all moisture from vegetables before mixing to prevent soggy wrappers.
Never drain on paper towels—use a wire rack to maintain crispiness.
Store cooked lumpia refrigerated for up to 3 days. Reheat in 375°F oven for 10-12 minutes.
Serve with sweet chili vinegar sauce, banana ketchup, or soy-vinegar dip with garlic.
- Prep Time: 25
- Cook Time: 20
- Category: Appetizer, Snack
- Method: Deep Frying
- Cuisine: Filipino
Nutrition
- Serving Size: 2 lumpia
- Calories: 95
- Sugar: 1g
- Sodium: 185mg
- Fat: 5g
- Saturated Fat: 1g
- Unsaturated Fat: 4g
- Trans Fat: 0g
- Carbohydrates: 8g
- Fiber: 1g
- Protein: 5g
- Cholesterol: 18mg
Keywords: lumpia, filipino spring rolls, crispy lumpia, chicken lumpia, filipino appetizer