
Are you tired of serving the same predictable desserts at your gatherings?
Do your sweet treats lack that “wow factor” that makes guests reach for seconds? Red velvet dessert cups are the solution you’ve been searching for! These adorable, perfectly-portioned treats combine the rich, velvety goodness of classic red velvet cake with creamy frosting in an elegant, individual serving that’s guaranteed to impress.
At Cooks Foody, we’ve perfected these red velvet dessert cups through countless test kitchen experiments. What started as Elizabeth Harper’s attempt to reinvent a family favorite has evolved into one of our most requested recipes.
The vibrant red color, subtle cocoa notes, and cream cheese frosting create an irresistible flavor combination that’s both nostalgic and fresh.
As you read on, you’ll discover our foolproof method for creating these show-stopping treats, tips for customization, and expert advice to ensure your red velvet dessert cups turn out perfectly every time.
Why These Red Velvet Dessert Cups Work
● No baking skills required – simple steps anyone can follow
● Perfectly portioned for parties and portion control
● Prep ahead and assemble just before serving
● Stunning presentation with minimal effort
● Versatile recipe that can be customized for any occasion
Choosing the Right Ingredients for Red Velvet Dessert Cups
Best Base Options for Red Velvet Dessert Cups
The foundation of great red velvet dessert cups starts with the perfect cake. You can choose between making your own red velvet cake from scratch or using a quality store-bought mix. For the time-conscious cook, even cubed red velvet cupcakes work beautifully. The key is ensuring your cake has that distinctive cocoa-tinged flavor and vibrant red color that defines true red velvet.
Frosting Fundamentals for Red Velvet Dessert Cups
Traditional cream cheese frosting complements red velvet perfectly, offering a tangy contrast to the sweet cake. Look for full-fat cream cheese for the richest flavor and smoothest texture. If you’re feeling adventurous, try our white chocolate cream cheese variation that adds an extra layer of decadence to your dessert cups.
Garnishes & Add-ins for Red Velvet Dessert Cups
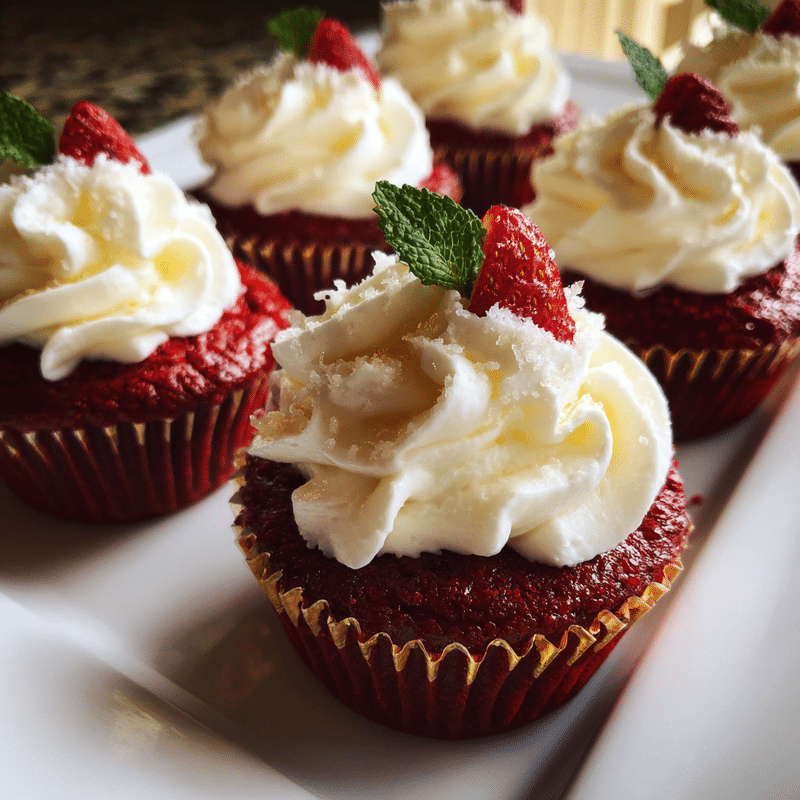
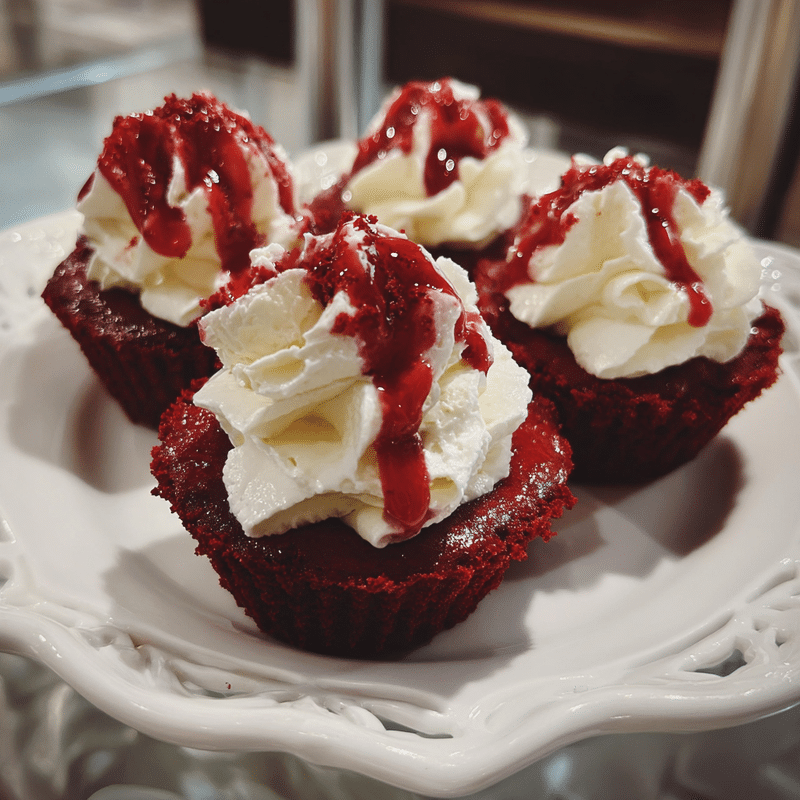
The finishing touches can elevate your red velvet dessert cups from delicious to unforgettable. Consider chocolate shavings, fresh berries, or crushed cookies for texture and visual appeal. For special occasions, edible gold dust or festive sprinkles make these cups celebration-worthy.
Looking for more chocolate-based treats? Check out our Chocolate Marshmallow Swirl Cookies for another crowd-pleasing dessert option!
Ingredients & Prep for Red Velvet Dessert Cups
Red Velvet Base Essentials
- 1 box red velvet cake mix (plus ingredients called for on box)
- OR 2 cups red velvet cake crumbs (from homemade or store-bought cake)
- 2 tablespoons melted butter (for binding cake crumbs)
- 12 clear plastic dessert cups (4 oz size)
Cream Cheese Filling Components
- 8 oz cream cheese, softened
- 1/2 cup powdered sugar
- 1 teaspoon vanilla extract
- 1 cup heavy whipping cream, whipped to soft peaks
- 2 tablespoons sugar (for whipping cream)
Decorative Elements
- White chocolate curls
- Fresh raspberries or strawberries
- Mint leaves (optional)
- Red velvet cake crumbs for garnish
Step-by-Step Red Velvet Dessert Cups Instructions
1. Preparing the Red Velvet Base
Start by crumbling your red velvet cake into fine crumbs. If using a cake mix, bake according to package directions, cool completely, and then crumble. In a mixing bowl, combine the cake crumbs with melted butter until the mixture holds together when pressed. This creates the perfect moist but firm base for your dessert cups.
2. Creating the Cream Cheese Filling
Beat the softened cream cheese until smooth, then add powdered sugar and vanilla, mixing until completely incorporated. In a separate bowl, whip the heavy cream with sugar until soft peaks form. Gently fold the whipped cream into the cream cheese mixture, creating a light, mousse-like filling that will be the star of your dessert cups.
3. Assembling the Red Velvet Dessert Cups
Press about 2 tablespoons of the red velvet cake mixture into the bottom of each clear cup, creating an even layer. Add a generous layer of cream cheese filling using a piping bag for a professional look. Continue alternating layers, finishing with the cream cheese mixture on top for a beautiful presentation.
4. Garnishing the Red Velvet Dessert Cups
The final touch that makes these dessert cups truly special! Sprinkle the tops with reserved red velvet crumbs, add white chocolate curls, and garnish with fresh berries. For special occasions, consider a light dusting of powdered sugar or edible glitter.
5. Chilling for Perfect Red Velvet Dessert Cups
Refrigerate the assembled cups for at least 2 hours before serving. This crucial step allows the flavors to meld and the textures to set properly, ensuring the perfect bite every time.
Pro Tips for Perfect Red Velvet Dessert Cups
Avoiding Common Red Velvet Dessert Cup Mistakes
- Don’t overmix your cake crumbs with butter – it should be just moist enough to hold shape
- Allow cream cheese to fully soften for a smooth, lump-free filling
- Use clear cups to showcase the beautiful layers
- Chill cups thoroughly before serving for the best texture and flavor
Tool Recommendations for Red Velvet Dessert Cups
- Piping bags with decorative tips create professional-looking layers
- Cookie scoop ensures consistent cake layer portions
- Offset spatula helps create clean, even layers
- Mini trifle dishes make an elegant alternative to plastic cups for formal events
Storage & Make-Ahead Red Velvet Dessert Cup Tips
- Prepare components up to 2 days ahead and assemble day-of
- Store assembled cups in refrigerator for up to 3 days
- Not suitable for freezing due to texture changes in the cream cheese filling
Flavor Variations for Red Velvet Dessert Cups
Chocolate Lover’s Red Velvet Dessert Cups
Add mini chocolate chips between layers and replace white chocolate garnish with dark chocolate shavings for an extra chocolatey experience. A drizzle of chocolate ganache on top takes these cups to new heights of indulgence.
Fruit-Infused Red Velvet Dessert Cups
Incorporate berry compote or preserves between the layers for a fruity twist. Strawberry, raspberry, or cherry flavors pair beautifully with the red velvet base. Fresh berries not only add vibrant color but also bring a refreshing contrast to the rich cake and creamy filling.
Holiday Red Velvet Dessert Cups
Customize these dessert cups for special occasions by incorporating seasonal elements. For Christmas, add crushed candy canes or peppermint extract to the filling. Valentine’s Day versions can feature heart-shaped sprinkles or edible rose petals.
| Season | Flavor Addition | Garnish Suggestion | Special Touch |
|---|---|---|---|
| Spring | Lemon zest in filling | Fresh berries | Edible flowers |
| Summer | Orange extract | Citrus slices | Tropical fruits |
| Fall | Cinnamon | Candied pecans | Maple drizzle |
| Winter | Peppermint | Crushed candy canes | White chocolate |
For festive holiday treats, you might also enjoy our Candy Cane Brownie Bombs recipe!
Serving Suggestions for Red Velvet Dessert Cups
These elegant individual desserts are perfect for buffets, dinner parties, or any gathering where you want to impress guests without spending hours on dessert. Serve them on a beautiful tray garnished with fresh mint leaves and extra berries for a professional presentation.
For the perfect dessert pairing, offer coffee or hot chocolate alongside your red velvet dessert cups. The slight bitterness of coffee enhances the subtle chocolate notes in the red velvet, while the creamy sweetness of hot chocolate makes for a decadent combination.
Looking to explore global flavors? Our Persian Shish Andaz offers a unique culinary adventure!
FAQs About Red Velvet Dessert Cups
Can I make red velvet dessert cups without artificial food coloring?
Yes! Natural alternatives include beet powder or puree, which provides a natural red hue with subtle earthy flavor that works wonderfully with the cocoa in red velvet. Approximately 3 tablespoons of beet powder or 1/4 cup beet puree can replace traditional red food coloring.
How far in advance can I make red velvet dessert cups?
You can prepare all components 1-2 days ahead and store separately. For best results, assemble the cups no more than 24 hours before serving. The fully assembled cups will keep in the refrigerator for up to 3 days, though the cake may begin to soften slightly.
Are red velvet dessert cups suitable for freezing?
Unfortunately, these dessert cups don’t freeze well due to the cream cheese filling, which can separate and become grainy when thawed. It’s best to enjoy them fresh or within a few days of preparation.
Can I make mini red velvet dessert cups for a larger party?
Absolutely! Use 2-ounce shot glasses or mini dessert cups for bite-sized treats. Reduce the amount of each layer accordingly, and consider using a small piping tip for more precise assembly. Mini versions are perfect for larger gatherings or dessert buffets.
Discover our complete collection of sweet treats on Pinterest where we share daily inspiration for your kitchen adventures!
Conclusion
Red velvet dessert cups represent everything we love about cooking at Cooks Foody they’re approachable yet impressive, traditional yet innovative, and most importantly, absolutely delicious. These individual treats allow you to express your creativity through various garnishes and presentations while maintaining that classic red velvet flavor everyone loves.
We’d love to see your red velvet dessert cup creations! Share your photos and variations with us, and don’t forget to check out our Red Velvet Dessert Cups page for even more inspiration and ideas!
Print
How to Make Red Velvet Dessert Cups in 5 Easy Steps
- Total Time: 45 mins
- Yield: 6 dessert cups 1x
- Diet: Vegetarian
Description
Elegant and indulgent Red Velvet Dessert Cups layered with moist red velvet cake, creamy cheesecake mousse, and a hint of chocolate perfect for parties, holidays, or a romantic dessert.
Ingredients
1 box red velvet cake mix (plus ingredients listed on box)
8 oz cream cheese, softened
1 cup heavy whipping cream
1/2 cup powdered sugar
1 tsp vanilla extract
1/2 cup white chocolate chips (optional)
Crumbled red velvet cake for layering
Chocolate shavings or sprinkles for garnish
Instructions
1. Prepare the red velvet cake according to package directions. Let it cool completely.
2. In a large bowl, beat cream cheese until smooth and creamy.
3. Add powdered sugar and vanilla extract; mix until well combined.
4. In a separate bowl, whip the heavy cream until stiff peaks form.
5. Gently fold the whipped cream into the cream cheese mixture to create a light mousse.
6. Crumble the cooled red velvet cake into small pieces.
7. In dessert cups, layer crumbled cake, mousse, and more cake until filled.
8. Top with a final swirl of mousse and garnish with chocolate shavings or red velvet crumbs.
9. Chill for at least 1 hour before serving.
Notes
For an extra decadent touch, drizzle melted white chocolate between layers.
Can be made a day ahead and stored in the refrigerator.
Try using mini cups for party-friendly individual portions.
- Prep Time: 20 mins
- Cook Time: 25 mins
- Category: Dessert
- Method: Layered
- Cuisine: American
Nutrition
- Serving Size: 1 cup
- Calories: 420
- Sugar: 32g
- Sodium: 310mg
- Fat: 26g
- Saturated Fat: 15g
- Unsaturated Fat: 10g
- Trans Fat: 0g
- Carbohydrates: 40g
- Fiber: 1g
- Protein: 6g
- Cholesterol: 85mg
Keywords: Red velvet dessert cups, layered dessert, cheesecake mousse, party dessert, Valentine’s dessert