
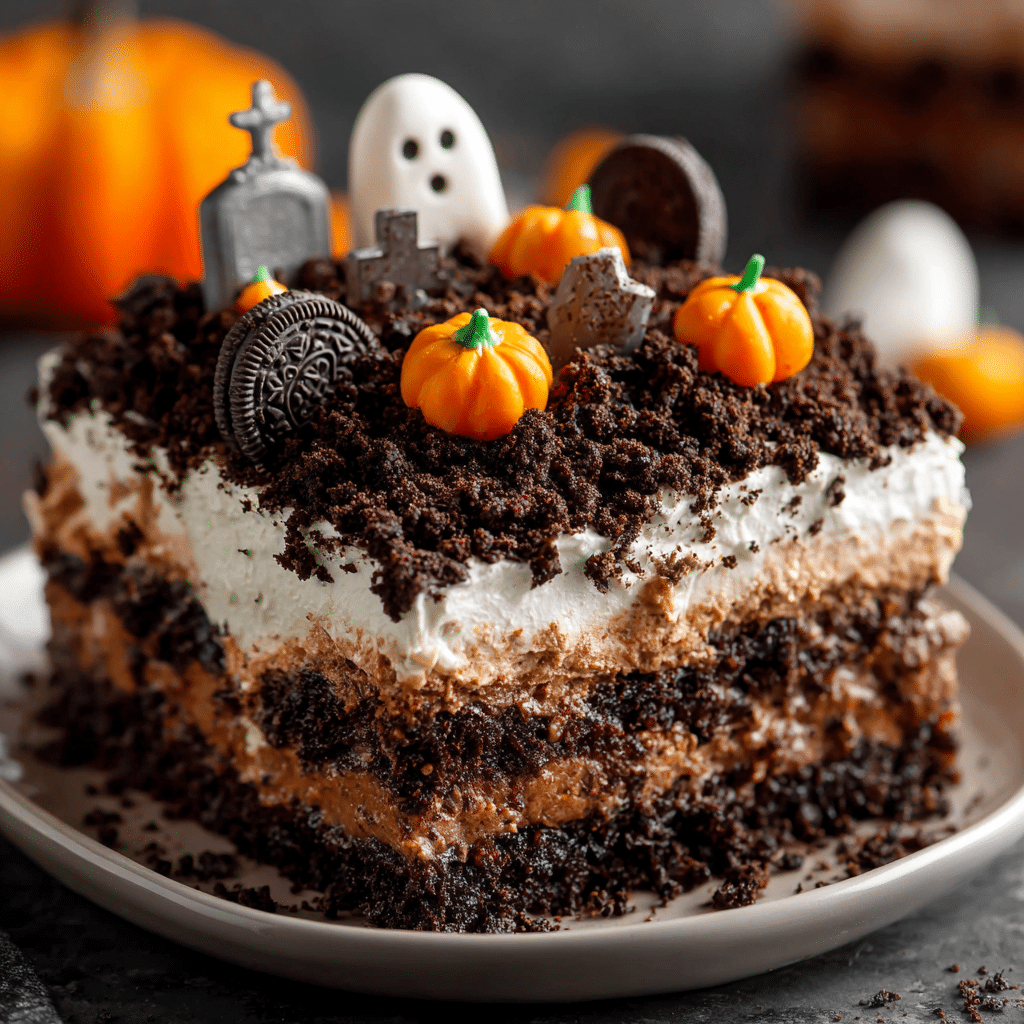
Graveyard Dirt Cake is the ultimate no-bake Halloween dessert that transforms simple ingredients into a spooky, show-stopping treat.
Hi, I’m Jack from Cooks Foody, and I’ve been creating crowd-pleasing desserts for years. Last Halloween, I watched my nephew’s eyes light up when I served this creepy creation at our family gathering.
The combination of crushed cookies, creamy pudding, and gummy worms brought squeals of delight from kids and adults alike. Are you tired of spending hours in the kitchen for party desserts? This Graveyard Dirt Cake comes together in under 30 minutes with zero baking required, making it perfect for busy hosts who want maximum impact with minimal effort.
In this guide, I’ll walk you through ingredient selection, assembly techniques, creative decoration ideas, and expert tips to ensure your dessert becomes the talk of the party.
Why This Graveyard Dirt Cake Recipe Works
This Graveyard Dirt Cake delivers the perfect balance of creepy presentation and crowd-pleasing flavor while keeping preparation stress-free:
- No oven required assembles in minutes using simple layering techniques
- Kid-friendly fun children love helping create the spooky graveyard scene
- Budget-conscious uses affordable grocery store ingredients available year-round
- Make-ahead friendly tastes even better after chilling overnight
- Customizable decorations adapt the spookiness level for any age group
- Feeds a crowd easily serves 12-15 people from one 9×13 pan
Choosing the Right Components for Graveyard Dirt Cake
Best Cookie Base Options
The “dirt” layer makes or breaks your Graveyard Dirt Cake. Chocolate sandwich cookies create the most authentic graveyard soil texture. Crush them in a food processor for fine crumbs, or place them in a sealed bag and use a rolling pin for a chunkier, more realistic dirt appearance. Avoid generic sandwich cookies as they often lack the deep chocolate color needed for authentic-looking dirt.
Buying Tips for Success
Look for fresh cookies with a strong snap when broken stale cookies create gummy dirt rather than crumbly soil. Purchase instant pudding rather than cook-and-serve varieties to save time. Select cream cheese that’s full-fat for the richest, most stable cream layer that won’t separate during assembly.
Smart Substitutions
Swap vanilla pudding for chocolate pudding to create darker “soil” layers. Replace gummy worms with gummy spiders or candy bones for varied creepy-crawly effects. Use dairy-free cream cheese and plant-based whipped topping for guests with dietary restrictions.
Ingredients & Prep for Graveyard Dirt Cake
Dessert Base Essentials
Creating the perfect Graveyard Dirt Cake requires no special prep beyond basic mixing. Ensure your cream cheese reaches room temperature for 30 minutes before starting this prevents lumps in your cream layer. Chill your mixing bowl for 10 minutes before whipping cream for better volume and stability.
Layer Components
Cookie “Dirt” Layer:
- 36 chocolate sandwich cookies (about 1 package)
- Crush until fine crumbs form
Cream Layer:
- 8 oz cream cheese, softened
- 1/4 cup unsalted butter, softened
- 1 cup powdered sugar
- 3 cups whipped topping, divided
- 2 packages (3.9 oz each) instant vanilla pudding mix
- 3 1/4 cups cold milk
Decorative Toppings:
- 10-12 gummy worms
- 8-10 Milano cookies (for tombstones)
- Black decorating gel
- Candy pumpkins or skeleton decorations
Assembly Staples
Use a clear trifle dish to showcase the layers, or a 9×13 inch baking dish for traditional presentation. Have piping bags ready for writing “RIP” messages on cookie tombstones. Chill time of 4 hours minimum allows layers to set properly.
Step-by-Step Cooking Instructions for Graveyard Dirt Cake

Pre-Assembly Prep for Graveyard Dirt Cake
Begin by crushing your chocolate sandwich cookies in a food processor, pulsing 8-10 times until they resemble fine soil. Set aside one cup of cookie crumbs for the top layer. In a large mixing bowl, beat softened cream cheese and butter together for 2-3 minutes until light and fluffy with no lumps remaining. Gradually add powdered sugar, beating until fully incorporated. Fold in 1 cup of whipped topping gently to maintain airiness.
Assembly Method for Graveyard Dirt Cake
Spread half the remaining cookie crumbs evenly across the bottom of your 9×13 inch dish, creating a 1/2-inch dirt foundation. In a separate bowl, whisk together pudding mix and cold milk for exactly 2 minutes until thickened. Let stand 5 minutes to fully set. Fold the pudding mixture into the cream cheese mixture until smooth and evenly combined. Spread this creamy layer over the cookie base, smoothing with an offset spatula. Spread the remaining 2 cups of whipped topping over the pudding layer. Sprinkle the reserved cookie crumbs over the entire top surface.
If you enjoyed this recipe, be sure to share it with your friends or save it for later!
I’d love to see your unique twist feel free to share your photos on Pinterest
Decoration Setup for Graveyard Dirt Cake
Using black decorating gel, write “RIP” and dates on Milano cookies to create tombstones. Insert these vertically into the cake at various angles. Arrange gummy worms so they appear to be crawling out of the dirt drape some over the edge of the pan for dramatic effect. Add candy pumpkins, plastic spiders, or miniature skeleton decorations around the tombstones.
Chilling Phase for Graveyard Dirt Cake
Cover the dish loosely with plastic wrap, ensuring the wrap doesn’t touch the decorated surface. Refrigerate for at least 4 hours, though overnight chilling produces the best texture as flavors meld and layers fully set. The Graveyard Dirt Cake can be made up to 24 hours in advance.
Pro Tips for Perfect Graveyard Dirt Cake
Avoiding Common Mistakes with Graveyard Dirt Cake
Don’t skip softening the cream cheese completely cold cream cheese creates stubborn lumps that ruin the smooth texture. Avoid over-mixing the whipped topping into the cream layer as this deflates the airy texture. Never use cook-and-serve pudding instead of instant the additional heat and cooking time disrupts the no-bake nature and creates a runny consistency.
Tool Recommendations
A food processor crushes cookies to perfect “dirt” consistency in seconds. An offset spatula spreads layers smoothly without disturbing previous layers. Use a large trifle bowl to show off the beautiful layers for an impressive presentation at parties.
Storage & Serving
Store covered Graveyard Dirt Cake in the refrigerator for up to 3 days, though the cookie crumbs will soften over time as they absorb moisture from the cream layers. Serve chilled directly from the refrigerator. This dessert doesn’t freeze well due to the whipped topping and pudding components breaking down during thawing.
Flavor Variations for Graveyard Dirt Cake
Chocolate Lover’s Twist
Replace vanilla pudding with chocolate pudding for double chocolate intensity. Use chocolate whipped topping instead of regular for an extra layer of cocoa flavor. Add mini chocolate chips to the cookie crumbs for buried “treasure.”
Peanut Butter Version
Add 1/2 cup creamy peanut butter to the cream cheese mixture for a rich, nutty undertone. Use peanut butter sandwich cookies instead of chocolate cookies. Top with chopped peanut butter cups for extra indulgence.
Adult Party Adaptation
This table shows how to customize your Graveyard Dirt Cake for different party themes and preferences:
| Variation | Key Modification | Best For | Decoration Idea |
|---|---|---|---|
| Mint Graveyard | Add 1/2 tsp mint extract to cream layer | Holiday parties | Green-tinted whipped cream “moss” |
| Coffee Cemetery | Mix 2 tbsp instant coffee into pudding | Adult gatherings | Chocolate-covered espresso beans |
| Spiced Autumn | Add 1 tsp pumpkin pie spice to cream | Fall celebrations | Candy corn tombstones |
| Berry Burial | Layer fresh raspberries with cream | Summer parties | Red “blood” raspberry sauce |
Serving Suggestions for Graveyard Dirt Cake
Serve generous squares of Graveyard Dirt Cake on black or orange plates to enhance the Halloween theme. Pair with hot apple cider or warm spiced punch for a cozy autumn dessert experience. For adult parties, serve alongside dark roast coffee or creamy hot chocolate spiked with peppermint schnapps. Create a dessert buffet by serving alongside pumpkin cupcakes, caramel apple slices, and candy corn bark. Present the entire 9×13 dish as a centerpiece on your dessert table, allowing guests to serve themselves directly from the spooky graveyard scene.
FAQs About Graveyard Dirt Cake
Can I make Graveyard Dirt Cake in advance? Yes, this dessert actually improves when made 12-24 hours ahead. The flavors meld beautifully and the layers set perfectly. Add gummy worms and decorative elements just before serving to prevent them from becoming soggy.
How do I prevent the layers from mixing together? Ensure each layer is spread gently without pressing down too hard. The cream cheese layer creates a natural barrier between the cookie base and pudding mixture. Chill between adding layers if you’re concerned about separation.
Is Graveyard Dirt Cake safe for young children? Absolutely! This dessert contains no raw eggs or undercooked ingredients. All components are ready-to-eat items mixed together. However, supervise young children with gummy worms to prevent choking hazards.
Can I use homemade whipped cream instead of whipped topping? While possible, stabilized whipped cream works best as regular whipped cream can break down over the 4-hour chilling period. If using homemade, add 1 tablespoon of powdered sugar per cup of heavy cream for better stability.
What’s the best way to transport this dessert? Use a sturdy 9×13 dish with a tight-fitting lid. Place the dish on a flat surface in your vehicle and avoid stacking items on top. Keep it in a cooler with ice packs if traveling more than 30 minutes.
How can I make this dessert less sweet? Reduce the powdered sugar to 1/2 cup in the cream cheese layer. Use sugar-free instant pudding mix. Choose dark chocolate sandwich cookies which have less sugar than regular varieties.
Conclusion
Fire up your party planning and add this Graveyard Dirt Cake to your Halloween menu tonight! This no-bake dessert has become a beloved tradition in my kitchen at Cooks Foody, bringing smiles to thousands of home cooks who’ve discovered how easy impressive party desserts can be. The combination of creamy layers, crunchy cookie “dirt,” and playful decorations creates an unforgettable experience that guests request year after year.
Print
Graveyard Dirt Cake 5 Easy Steps for Amazing Halloween Dessert
- Total Time: 4 hours 30 minutes (including chill time)
- Yield: 12–15 servings 1x
- Diet: Vegetarian
Description
This spooky Graveyard Dirt Cake is a no-bake Halloween dessert featuring layers of crushed chocolate cookies, creamy pudding, and gummy worms. Perfect for parties and ready in just 30 minutes with no oven required!
Ingredients
36 chocolate sandwich cookies, crushed into fine crumbs
8 oz cream cheese, softened to room temperature
1/4 cup unsalted butter, softened
1 cup powdered sugar
3 cups whipped topping, divided
2 packages (3.9 oz each) instant vanilla pudding mix
3 1/4 cups cold milk
10–12 gummy worms for decoration
8–10 Milano cookies for tombstones
Black decorating gel for writing on tombstones
Candy pumpkins or skeleton decorations (optional)
Instructions
1. Crush chocolate sandwich cookies in food processor until fine crumbs form. Reserve 1 cup for topping and spread remaining crumbs in bottom of 9×13 inch dish.
2. Beat softened cream cheese and butter together for 2-3 minutes until fluffy and smooth with no lumps.
3. Add powdered sugar gradually and beat until fully incorporated. Fold in 1 cup whipped topping gently.
4. In separate bowl, whisk pudding mix and cold milk for 2 minutes until thickened. Let stand 5 minutes to set completely.
5. Fold pudding mixture into cream cheese mixture until smooth and evenly combined.
6. Spread cream mixture over cookie base in dish, smoothing with offset spatula.
7. Spread remaining 2 cups whipped topping over pudding layer evenly.
8. Sprinkle reserved cookie crumbs over entire top surface to create “dirt” layer.
9. Use black decorating gel to write “RIP” on Milano cookies to create tombstones.
10. Insert tombstone cookies vertically into cake at various angles. Arrange gummy worms crawling out of dirt.
11. Add candy pumpkins or skeleton decorations around tombstones for extra spooky effect.
12. Cover loosely with plastic wrap and refrigerate for at least 4 hours or overnight before serving.
Notes
Make this dessert 12-24 hours ahead for best flavor and texture as layers set perfectly.
Ensure cream cheese is fully softened to room temperature to prevent lumps in the cream layer.
Use instant pudding mix only—cook-and-serve pudding will not work for this no-bake recipe.
Store covered in refrigerator for up to 3 days, though cookie crumbs soften over time.
For dairy-free version, substitute with plant-based cream cheese and dairy-free whipped topping.
Add gummy worms just before serving if making far in advance to prevent them becoming soggy.
This dessert serves 12-15 people and is perfect for Halloween parties, school events, or family gatherings.
- Prep Time: 30
- Category: Dessert
- Method: No-Bake
- Cuisine: American
Nutrition
- Serving Size: 1 square (approximately 4×3 inches)
- Calories: 385
- Sugar: 34g
- Sodium: 320mg
- Fat: 18g
- Saturated Fat: 11g
- Unsaturated Fat: 5g
- Trans Fat: 0g
- Carbohydrates: 52g
- Fiber: 1g
- Protein: 4g
- Cholesterol: 35mg
Keywords: graveyard dirt cake, halloween dessert, no-bake dessert, dirt cake, halloween party food