Pumpkin Patch Dirt cups are the ultimate solution when you need a dessert that’s both adorable and effortless.
Are you tired of spending hours on complicated Halloween treats that end up looking messy? I’ve been there stressed in the kitchen while party guests arrive, desperately trying to salvage a Pinterest-fail dessert. That’s when I discovered these magical little cups.
Hi, I’m Jack welcome to my kitchen! As the creator of Cooks Foody, I’ve learned that the best recipes combine simplicity with wow-factor.
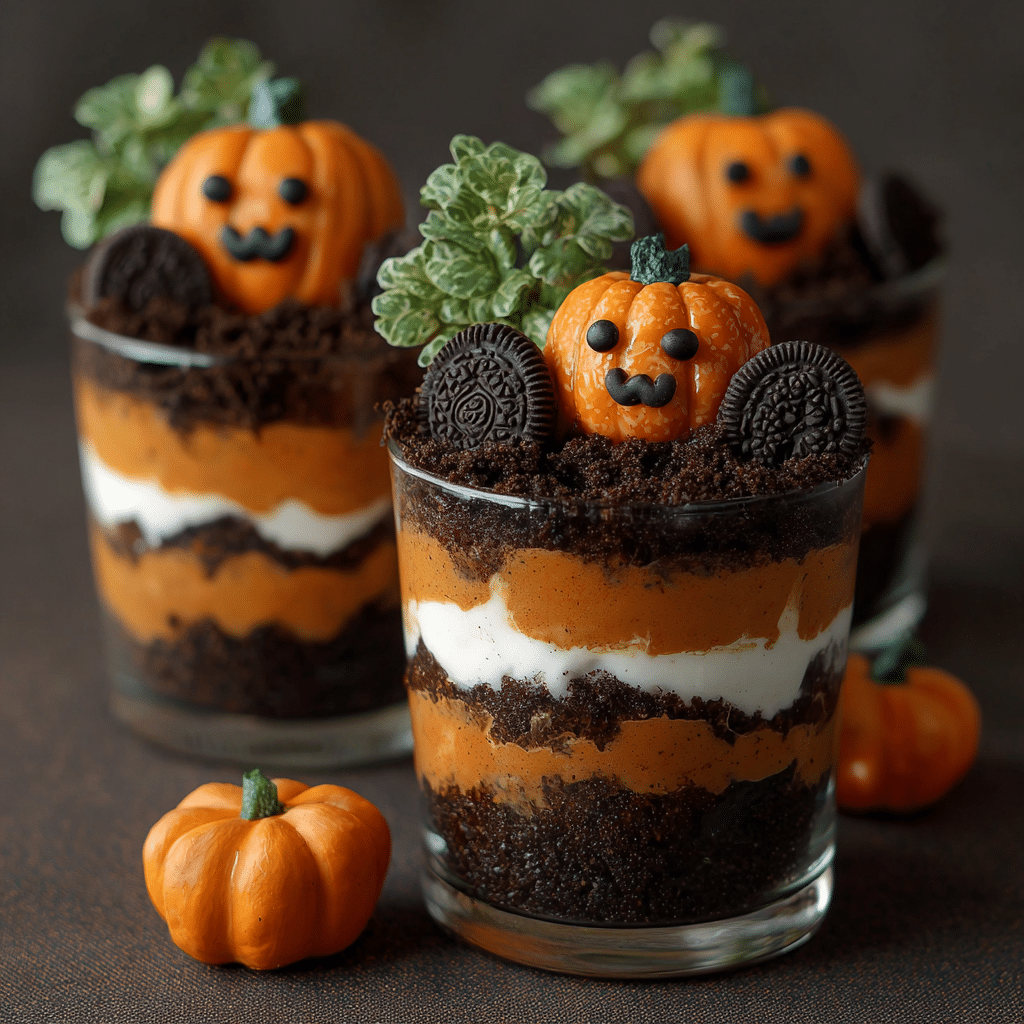
These Pumpkin Patch Dirt Cups deliver creamy chocolate pudding layered with crushed cookies, topped with candy pumpkins that look like they’re growing in a real garden. No baking required, minimal cleanup, and guaranteed smiles from kids and adults alike.
In this comprehensive guide, you’ll discover why this no-bake recipe works perfectly for busy schedules, how to choose the right ingredients for maximum flavor and texture, essential assembly techniques, step-by-step instructions with time-saving tips, creative variations to match any theme, and answers to your most common dessert questions. Let’s create some spooky magic together!
Why This Pumpkin Patch Dirt Cups Recipe Works
These Pumpkin Patch Dirt Cups have become my secret weapon for stress-free entertaining because they combine visual appeal with foolproof execution and incredible taste.
- Uses affordable, grocery-store ingredients Everything you need is available at your local supermarket, no specialty shops required
- Assemble in 15 minutes for impressive results The quick prep time means you can make dozens without breaking a sweat
- Perfect for parties or casual family treats Scale from intimate gatherings to large Halloween celebrations with ease
- No baking or cooking skills needed Even kitchen beginners create professional-looking results every single time
- Make-ahead friendly for busy schedules Prepare up to 24 hours in advance, then add toppings just before serving
Choosing the Right Ingredients for Pumpkin Patch Dirt Cups
Success with Pumpkin Patch Dirt Cups depends on selecting quality components that create the perfect texture contrast and rich chocolate flavor.
Best Components for This Recipe
Instant pudding vs. homemade: Instant chocolate pudding provides consistent results and saves valuable time. The stabilizers help it maintain structure when layered, preventing the “dirt” from getting soggy. If you prefer homemade, ensure it’s completely chilled and thick before assembly.
Cookie selection matters: Chocolate sandwich cookies (like Oreos) create authentic-looking “dirt” when crushed. The cream filling adds richness while the chocolate wafers provide the dark color that mimics real soil.
Candy pumpkins are essential: Look for small candy pumpkins or mellowcreme pumpkins in autumn colors. These create the signature pumpkin patch appearance that makes these cups so charming.
Buying Tips
Choose fresh cookies with intact cream filling stale cookies create dusty, less flavorful dirt. When selecting pudding mix, check expiration dates for optimal flavor. For whipped topping, full-fat versions create richer, more stable layers than light alternatives. Buy candy pumpkins in bulk during October for the best prices and selection.
Substitutions
Dairy-free option: Use coconut milk pudding and dairy-free whipped topping for identical results. Gluten-free version: Substitute gluten-free chocolate sandwich cookies, widely available at most grocers. Sugar-free adaptation: Use sugar-free pudding mix and reduced-sugar cookies the texture remains nearly identical.
Ingredients & Prep for Pumpkin Patch Dirt Cups

Component Prep Essentials
Before assembling your Pumpkin Patch Dirt Cups, organize these preparation steps:
- Chill clear cups or glasses in the refrigerator for 20 minutes for cleaner layers
- Crush cookies in a food processor or sealed bag with rolling pin until fine crumbs form
- Prepare pudding according to package directions and refrigerate for at least 5 minutes to set
- Gather all toppings and have them ready for quick assembly
Core Ingredients
For the Layers:
- 2 packages (3.9 oz each) instant chocolate pudding mix
- 4 cups cold milk
- 1 container (8 oz) whipped topping, thawed
- 1 package (14.3 oz) chocolate sandwich cookies, crushed
- 24 candy pumpkins
- 12 gummy worms (optional)
- Green fruit leather or candy leaves (optional)
For Enhanced Flavor:
- 1 teaspoon vanilla extract
- 2 tablespoons cocoa powder (for extra chocolate richness)
- Pinch of sea salt (enhances chocolate flavor)
Pantry Staples
Keep these essentials stocked: instant pudding in your favorite flavors, a backup package of chocolate cookies for spontaneous dessert emergencies, clear disposable cups in various sizes for different occasions, and festive candy decorations that match multiple seasons. Having these basics means you can create Pumpkin Patch Dirt Cups whenever celebration inspiration strikes.
Step-by-Step Assembly Instructions for Pumpkin Patch Dirt Cups

Pre-Assembly Prep for Pumpkin Patch Dirt Cups
Start by organizing your workspace efficiently. Set out all cups in rows on a baking sheet for easy transport to the refrigerator. Have your crushed cookies in a bowl, pudding mixture ready, and all decorations within arm’s reach. This assembly-line approach prevents rushing and creates uniform, professional-looking desserts.
Whisk pudding mix with cold milk for 2 minutes until smooth and slightly thickened. Fold in half the whipped topping gently to create a lighter, mousse-like texture. Reserve the remaining whipped topping for later use.
Assembly Method for Pumpkin Patch Dirt Cups
Creating the perfect layers:
- Spoon 2-3 tablespoons cookie crumbs into the bottom of each cup
- Add a generous layer of chocolate pudding mixture (about ¼ cup)
- Sprinkle another layer of cookie crumbs (2 tablespoons)
- Add a dollop of reserved whipped topping
- Cover completely with remaining cookie crumbs to create the “dirt” surface
- Refrigerate for at least 30 minutes to set all layers
Decoration Technique for Pumpkin Patch Dirt Cups
Press 2-3 candy pumpkins gently into the cookie “dirt” on top of each cup. Arrange them at slight angles like they’re growing naturally. For extra charm, add a gummy worm peeking out from the dirt, or cut small leaves from green fruit leather and position them next to pumpkins. These final touches transform simple cups into miniature edible gardens.
Chilling for Pumpkin Patch Dirt Cups
Refrigerate assembled cups for at least 30 minutes before serving, or up to 24 hours for make-ahead convenience. The chilling time allows layers to settle and flavors to meld. If making ahead, wait to add gummy worms until just before serving to prevent them from becoming too soft. Cover cups loosely with plastic wrap to prevent refrigerator odors from affecting taste.
If you enjoyed this recipe, be sure to share it with your friends or save it for later!
I’d love to see your unique twist feel free to share your photos on Pinterest
Pro Tips for Perfect Pumpkin Patch Dirt Cups
Avoiding Soggy or Messy Pumpkin Patch Dirt Cups
Don’t skip the chilling step Unchilled pudding creates runny layers that mix together instead of staying distinct. Patience here ensures Instagram-worthy results.
Use clear cups to showcase layers The visual appeal comes from seeing the chocolate layers contrasting with cookie crumbs. Clear plastic cups, mason jars, or glass tumblers all work beautifully.
Crush cookies to fine crumbs Large chunks create gaps in your “dirt” layer and don’t look as realistic. Process until resembling actual soil texture.
Tool Recommendations
Invest in a food processor for perfectly crushed cookies in seconds. Disposable piping bags create clean pudding layers without mess. Clear plastic cups with lids make these cups portable for school parties or potlucks. A small offset spatula helps smooth pudding layers for professional presentation.
Storage & Make-Ahead Tips
Store assembled Pumpkin Patch Dirt Cups covered in the refrigerator for up to 2 days. The cookies may soften slightly but remain delicious. For best texture, add the final cookie crumb layer and decorations within 4 hours of serving. These cups don’t freeze well due to the pudding and whipped topping breaking down, so make only what you’ll consume within 48 hours.
Flavor Variations for Pumpkin Patch Dirt Cups
Seasonal Twist
Transform these into Winter Wonderland Cups by using vanilla pudding, white chocolate cookies, and snowman marshmallows. Or create Spring Garden Cups with pistachio pudding, flower-shaped candies, and butterfly decorations.
Healthier Version
Use sugar-free pudding and reduced-fat whipped topping for a lighter option that still delivers on taste. Greek yogurt can replace half the whipped topping for added protein while maintaining creaminess.
Global Flavors
Try a Mexican Chocolate variation by adding ½ teaspoon cinnamon and a pinch of cayenne to your pudding mixture. Or create an Italian Tiramisu-inspired version with coffee-flavored pudding and vanilla wafer crumbs instead of chocolate cookies.
Flavor Variations Comparison Table
| Variation | Pudding Type | Cookie Type | Decorations | Best For |
|---|---|---|---|---|
| Classic Pumpkin Patch | Chocolate | Chocolate sandwich | Candy pumpkins, gummy worms | Halloween, fall parties |
| Monster Mash | Vanilla & chocolate swirl | Chocolate chip | Candy eyes, monster teeth | Kids’ Halloween parties |
| Graveyard Scene | Chocolate | Chocolate sandwich | Milano cookies (tombstones) | Adult Halloween gatherings |
| Autumn Harvest | Butterscotch | Vanilla wafers | Candy corn, leaf sprinkles | Thanksgiving desserts |
| Beach Bucket | Vanilla | Graham crackers | Gummy fish, umbrella picks | Summer beach parties |
Serving Suggestions for Pumpkin Patch Dirt Cups
These Pumpkin Patch Dirt Cups work beautifully as individual desserts that eliminate the need for cutting and plating, making them perfect for casual gatherings.
Pair with beverages: Serve alongside hot apple cider for a cozy autumn combination. Cold milk is perfect for kids, while adults might enjoy these with pumpkin spice coffee or hot chocolate with a cinnamon stick.
Create a dessert station: Arrange your Pumpkin Patch Dirt Cups on a rustic wooden board surrounded by scattered candy corn, mini hay bales (available at craft stores), and small decorative pumpkins. Add a sign that says “Pick Your Patch” for interactive charm.
Themed presentation: For Halloween parties, place cups on black or orange placemats with plastic spiders nearby. Add dry ice to a bowl of water beneath your serving tray for spooky fog effects that make your dessert table memorable.
FAQs About Pumpkin Patch Dirt Cups
Can I make these ahead of time? Yes! Assemble the pudding and cookie layers up to 24 hours in advance. Store covered in the refrigerator and add the final decorative layer of cookie crumbs and candy pumpkins 2-4 hours before serving for best texture.
Why is my pudding layer too thin? This happens when pudding hasn’t set properly before assembly. Make sure to whisk for the full 2 minutes and allow at least 5 minutes of refrigeration. Using very cold milk also helps pudding thicken properly.
Can I use homemade pudding instead? Absolutely! Prepare your favorite chocolate pudding recipe and ensure it’s completely cooled and thick before assembly. Homemade pudding may require longer chilling time to achieve the right consistency.
What if I can’t find candy pumpkins? Substitute with candy corn arranged in pumpkin shapes, orange jelly beans, or even fresh berries for a healthier alternative. The “dirt” and layering remain the star even with different toppings.
Are these suitable for dietary restrictions? Yes! Use dairy-free pudding and coconut whipped topping for dairy-free versions. Gluten-free chocolate cookies work perfectly for gluten sensitivities. Sugar-free options exist for all components.
How do I transport these to a party? Use cups with fitted lids or cover tightly with plastic wrap secured with rubber bands. Place cups in a shallow box or carrier that keeps them upright during transport. Keep refrigerated until serving.
Conclusion
These Pumpkin Patch Dirt Cups prove that impressive desserts don’t require baking expertise or hours in the kitchen just smart ingredient choices and a little creativity. The combination of rich chocolate layers, crunchy cookie “dirt,” and adorable candy pumpkins creates a treat that’s as fun to make as it is to eat.
Print
Pumpkin Patch Dirt Cups 5 Easy Steps for Adorable Halloween Treats
- Total Time: 45
- Yield: 12 1x
- Diet: Vegetarian
Description
Easy no-bake Pumpkin Patch Dirt Cups with rich chocolate pudding, crushed cookie layers, and adorable candy pumpkin decorations. Perfect for Halloween parties, fall celebrations, or fun family desserts. Ready in just 15 minutes with no cooking required!
Ingredients
2 packages (3.9 oz each) instant chocolate pudding mix
4 cups cold milk
1 container (8 oz) whipped topping, thawed
1 package (14.3 oz) chocolate sandwich cookies, crushed
24 candy pumpkins
12 gummy worms (optional)
1 teaspoon vanilla extract
2 tablespoons cocoa powder (optional, for extra chocolate flavor)
Pinch of sea salt
Green fruit leather or candy leaves (optional garnish)
Instructions
1. Prepare chocolate pudding according to package directions using cold milk. Whisk for 2 minutes until smooth and slightly thickened.
2. Fold half of the whipped topping into the pudding mixture gently to create a lighter, mousse-like texture. Reserve remaining whipped topping.
3. Place chocolate sandwich cookies in a food processor and pulse until fine crumbs form, resembling dirt texture.
4. Layer 2-3 tablespoons of cookie crumbs in the bottom of each clear cup or glass.
5. Add approximately ¼ cup of chocolate pudding mixture over the cookie layer.
6. Sprinkle another 2 tablespoons of cookie crumbs over the pudding.
7. Add a dollop of reserved whipped topping on the second cookie layer.
8. Cover completely with remaining cookie crumbs to create the top “dirt” layer.
9. Press 2-3 candy pumpkins gently into the top cookie layer at slight angles.
10. Add gummy worms peeking out from the dirt and green candy leaves if desired.
11. Refrigerate assembled cups for at least 30 minutes before serving to allow layers to set.
12. Serve chilled and enjoy your adorable pumpkin patches!
Notes
For best results, use very cold milk when preparing pudding to ensure proper thickening.
Crush cookies to fine crumbs for the most realistic “dirt” appearance.
Clear cups showcase the beautiful layers—use glass or plastic cups rather than opaque containers.
Make ahead up to 24 hours in advance; add final cookie crumb layer and decorations 2-4 hours before serving.
Store covered in refrigerator for up to 2 days, though texture is best within 24 hours.
Substitute dairy-free pudding and coconut whipped topping for dairy-free version.
Use gluten-free chocolate sandwich cookies for gluten-free adaptation.
Gummy worms may soften over time, so add just before serving if making ahead.
- Prep Time: 15
- Category: Dessert
- Method: No-Bake
- Cuisine: American
Nutrition
- Serving Size: 1 cup
- Calories: 245
- Sugar: 28g
- Sodium: 185mg
- Fat: 11g
- Saturated Fat: 6g
- Unsaturated Fat: 4g
- Trans Fat: 0g
- Carbohydrates: 35g
- Fiber: 1g
- Protein: 3g
- Cholesterol: 8mg
Keywords: pumpkin patch dirt cups, halloween dessert, no bake treats, dirt cups recipe, halloween party food